Arch Linux Installation
Installing and using Arch Linux is like embarking on a thrilling adventure in the world of open-source operating systems. With its minimalist design and customizable interface, Arch Linux grants you the freedom to build a personalized computing experience that's perfectly tailored to your needs.
But be warned, it's not for the faint of heart! Arch Linux requires a bit of technical know-how to install, but the payoff is an ultra-fast, streamlined system that's optimized for performance and efficiency.
If you're ready for this journey, go ahead and begin!
First boot
Download ISO file
- Firstly, you need to choose the latest ISO file. You do this by opening the Global mirror of Arch Linux. Arch releases a new ISO every month, so if you want to have a rescue drive ready for the worst-case, be sure to keep it updated.
Tip: If you want, you can choose another mirror from this link.
- Choose
archlinux-x86_64.isoand download it to a folder where you can access it easily.
Flash the ISO file
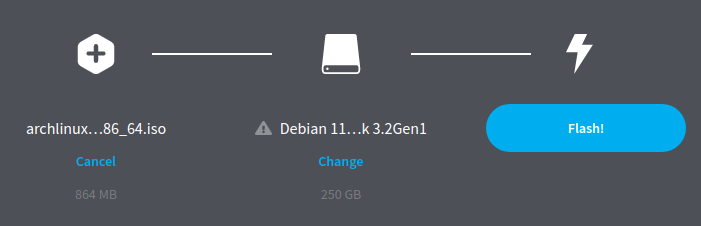
To be able to boot into the Arch ISO, we first have to flash it onto an external flash drive, like a USB stick. There are special programs designed to help you copy the contents of the ISO in a machine-readable format onto the stick. You can use Balena Etcher for this.
- Download Balena Etcher from their official website. You have to choose the appropriate package for your system.
Tip: If you're already on Arch Linux, and want to use Balena Etcher for other purposes, you can install it from the AUR (etcher-bin)
- Once you open the program, you'll be greeted with three options. Select your freshly downloaded Arch ISO, then on the second your flash drive, and finally flash! This process might take some time, depending on your transfer speeds, so go ahead and make some popcorn!
Warning! This will format your flash drive, which means that all data will be deleted! Proceed with caution!
- You're done! We can now proceed with installing Arch.

Booting into Arch
- We now have to boot into Arch Linux. You can do that by rebooting and entering your BIOS.
Note: Your hotkey for entering the BIOS depends on your OEM, so try googling for that first. Most of the time, it's either Esc, Delete, F1, F2, F10, F11, or F12.
- Here, we need to enable USB Booting, if you haven't done so already. Once that's done, press F10 to save and exit the BIOS.
- Enter your BIOS screen again, this time going to your Boot Override section. If you do not have that, or cannot find it, try reordering your Boot Order to prioritize USB-Drives temporarily. Choose your Arch Stick and boot into it.
- You're going to be presented with Arch's GRUB menu. Just press enter or wait until it boots by itself.

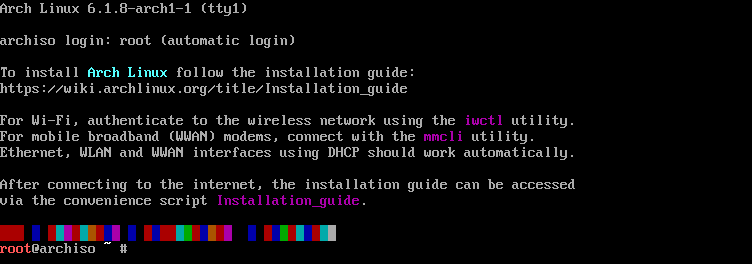
- Once the boot process is complete, you'll be presented with a nice looking shell like this:
 This is the screen you will spend a lot of time of the installation in.

Tip: You can change your keyboard layout temporarily with loadkeys
For example: loadkeys de-latin1 for german.
Connecting to the Internet
If you've connected your PC with an Ethernet cable, you can continue with the guide, as you should already have internet (ping a website like google.com to be sure). Though, if you want to connect to Wi-Fi, follow the next steps.
- Type in
iwctl - Scan for networks and list them using your network card. You can then connect using the
connectcommand. Note that your Wi-Fi card may be named something else.[iwd]# station wlan0 scan [iwd]# station wlan0 get-networks [iwd]# station wlan0 connect <SSID> Passphrase: <enter password> [iwd]# exit - Test your connection by pinging a website
root@archiso ~ # ping archlinux.org
If the connection succeeds, you can continue installing Arch. If not, try connecting to another network, or reconnecting. A reboot might also help.
Formatting Drives
-
You should now be inside the Arch shell. Below is a screenshot of what it looks like.
-
With the command below, you can list all currently attached drives. In that list, there should at least be your main Hard Drive and your Flash Drive.
root@archiso ~ # lsblk
 NAME   MAJ:MIN RM   SIZE RO TYPE MOUNTPOINTS
 loop0    7:0    0 710.1M  1 loop /run/archiso/airootfs
 sr0     11:0    1 824.3M  0 rom
 vda    254:0    0    20G  0 disk
In my case, my Hard Drive I'll be installing Arch to is
vdabecause I am in a Virtual Machine. Yours might be calledsda,nvme0n1porhda, depending on if you've installed an SSD, an NVMe SSD or an HDD respectively. -
We are now going to format this drive using
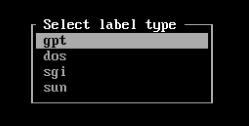
cfdisk. You can also format your drive withfdisk, butcfdiskhas a simple to navigate interface.root@archiso ~ # cfdisk /dev/vda- If your Hard Disk is empty, you're now going to be met with the following options. This will not show up if you've already partitioned your drive, like if you're coming from Windows, so if you see your partitions already, go to step 2.

Here, choosegpt(GUID Partition Table) for drives bigger than 2 TB and machines using UEFI anddos(Master Boot Record) otherwise. Once you come to this screen, you can skip the next step.
- If you come from another operating system, you're going to have a few entries here. You can either remove all the partitions, or create new ones to install Arch into. To remove partitions, use your arrow keys to navigate to the delete option and hit enter for each partition you'd like to delete.

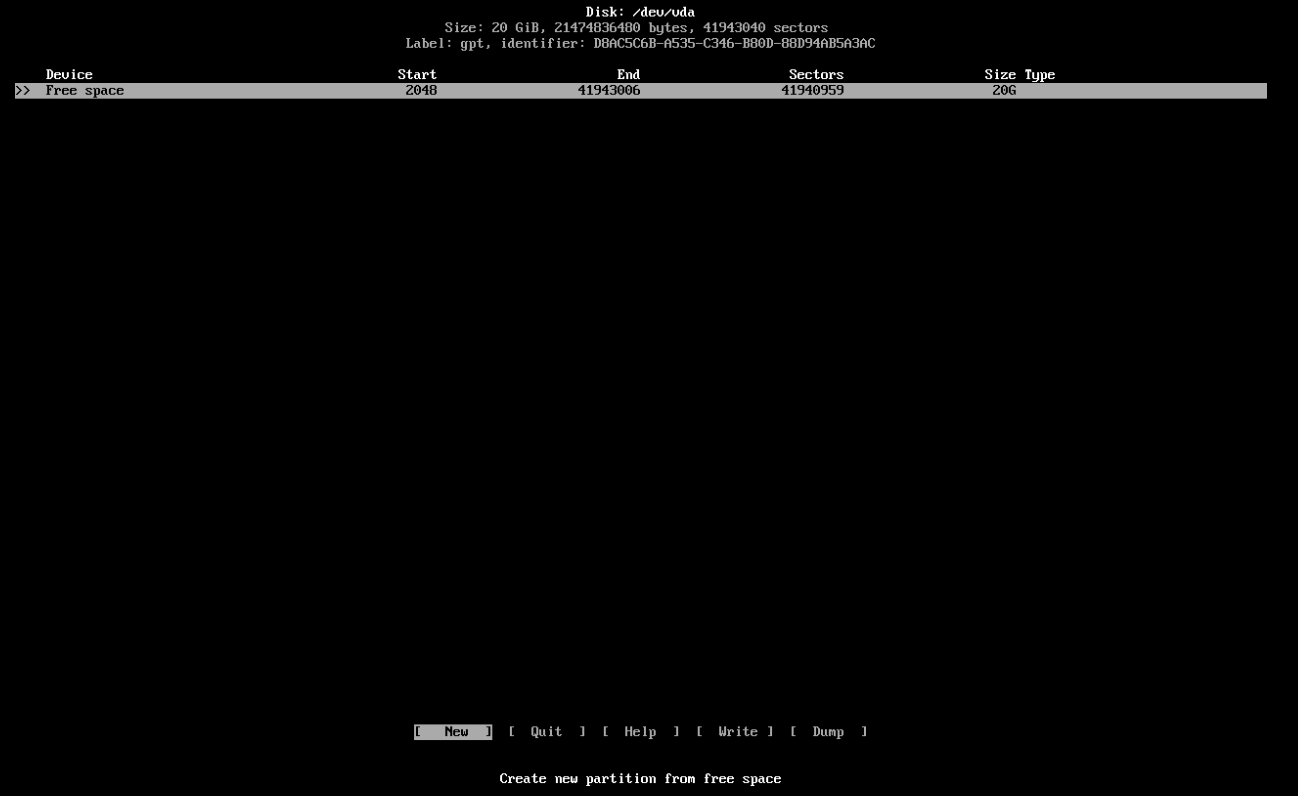
- Once you've got an empty slate, we can start creating all the necessary partitions. Create them in the order and sizes shown below.
Partition Size Boot 100M Swap Half your RAM Root The rest of your storage Tip: You can also create a Home partition now, if you want to be able to change distros without deleting your user data
Your Partitions should look something similar to this:

- Once you're done partitioning your drive, you can go over to the Write option, hit enter, and confirm the partitioning process by typing
yes. Then you can quit out ofcfdisk.
Danger! This process will permanently delete any partitions you chose to delete. Double-check your partitioning scheme, so that you do not delete important data.

- If your Hard Disk is empty, you're now going to be met with the following options. This will not show up if you've already partitioned your drive, like if you're coming from Windows, so if you see your partitions already, go to step 2.
-
We can now properly format the drives. For that, we need to know how the new partitions are called. Run
lsblkagain. In the guide above, we created the partitions like in the table below, andlsblkreflects that.Partition Name Boot /dev/vda1 Swap /dev/vda2 Root /dev/vda3 -
Let's first format the boot and root partitions with the following commands. Note that the boot partition has to be in FAT32, otherwise it won't be recognized:
#==> Important: replace /dev/vda with your drive!
root@archiso ~ # mkfs.fat -F 32 /dev/vda1 root@archiso ~ # mkfs.ext4 /dev/vda3
Note: You can also format your root partition to be in the BTRFS format, which allows snapshots. Just replace ext4 with btrfs in the command above.
-
Formatting the swap partition is a little different:
#==> Important: replace /dev/vda with your drive!
root@archiso ~ # mkswap /dev/vda2
-


You're done! You can now go to the next step of mounting the drives and installing Arch!
Installation
Mounting the drive
You've now formatted your drives successfully, you now need to install Linux itself. That is the longest part of the installation, so get ready!
Mount all your partitions with the following commands:
Note:
- Replace the /dev/vda device with your own.
- The following commands are for UEFI systems only.
# Mount the root partition
root@archiso ~ # mount /dev/vda3 /mnt
# Create boot partition mountpoint, and mount the boot partition
root@archiso ~ # mkdir -p /mnt/boot/efi
root@archiso ~ # mount /dev/vda1 /mnt/boot/efi
You've now successfully mounted your root and boot partitions in the correct place. Mounting the swap partition is a little different, though it is very simple:
root@archiso ~ # swapon /dev/vda2Now, check if you've mounted everything properly. Run lsblk to do so.
root@archiso ~ # lsblkBasic Installation
Installing the system is quite easy, just run the following command for the basic packages we need to boot. You can add your own packages at the end of the command (like git, wget, or curl), though we'll focus on the desktop environment and other optional packages later on. For now, you need a base system to work with.
root@archiso ~ # pacstrap /mnt base linux linux-firmware sof-firmware base-devel grub efibootmgr vim nano networkmanagerWith pacstrap we basically tell pacman (Arch's default package manager) to install packages into /mnt.base, linux, linux-firmware, grub and efibootmgr are packages we cannot boot without. The first 3 are self-explanatory, grub is our bootloader and efibootmgr provides UEFI support for GRUB.
In the command above, you'd also be installing vim, nano and networkmanager. The first two are text editors, that we need to edit our configurations, and networkmanager manages our network connection.
Note: If you need to connect to WiFi later on in the system, add iwd to the pacstrap command.
This command may take some time, depending on your internet speeds, to install everything onto your drive.
Tip: Try clearing your screen with Ctrl-L!
Once the command is done, we can look at fstab. The fstab command helps us generate a special file, that the system uses to automatically mount partitions (such as boot and swap) on system startup. It is crucial for us to generate this file. That is luckily very simple.
root@archiso ~ # genfstab /mntgenfstab outputs the available partitions on your drive. We do not want that outputted to our terminal, though, so we just redirect this command's output to the proper file.
root@archiso ~ # genfstab /mnt > /mnt/etc/fstabNote: You are not yet ready to reboot, please configure your system first.
Your system's now ready to be configured! You can now head on to the next step.
Configuration
Entering our system
Since we're unable to reboot yet, as we've not configured our system properly yet, the Arch Linux project has supplied us with a handy command to enter the system without booting into it. This can also be used to diagnose any issues you might have if you can't boot into the system.
root@archiso ~ # arch-chroot /mnt
You'll notice that the command prompt changes from the pretty red to a colorless and boring prompt. This is good as contrary as it may seem. You are now in your system!
Date and time
We need to set our timezone properly before we continue. For that, we can create a symlink:
[root@archiso /]# ln -sf /usr/share/zoneinfo/<Continent>/<City> /etc/localtime
Replace <Continent> and <City> with your appropriate time zone. For example, if my timezone would be the same as in Berlin, I would type Europe/Berlin in here. If you're not sure what timezone you should specify, you can press Tab to autocomplete.
Check if you set your timezone correctly by typing
[root@archiso /]# date
If your time seems correct, you can synchronise your system clock. Otherwise, reset your timezone correctly.
[root@archiso /]# hwclock --systohc
Language
We can set the correct locale for software to use by editing the following file:
[root@archiso /]# nano /etc/locale.gen
Inside that file, you can search for your preferred locale. I'm going to use en_US for this example. Uncomment the line with the locale of your choice. Press Ctrl-O, Enter and then Ctrl-X to save.
#en_US.UTF-8 UTF-8
^ uncomment this line by removing the #
Tip: With nano you can filter for words by pressing Ctrl-W.
Once you've set your locale, we need to generate it. Run this command to do so
[root@archiso /]# locale-gen
Now we need to set it. Edit /etc/locale.conf and add the following line:
[root@archiso /]# nano /etc/locale.conf
# Add the line below to this file.
LANG=en_US.UTF-8
If you need to set a different keyboard layout other than us, edit the following file:
[root@archiso /]# nano /etc/vconsole.conf
# Add the value below if you want to change your keyboard layout to (in this example) german.
# You can set KEYMAP= to any keymap you'd like. See the Arch Wiki for more.
KEYMAP=de-latin1
Users and Groups
We need to secure your root account, which is basically the system admin, and create your own user, as it is not a good idea to daily-drive the root account.
First off, change root's password. You will not see what you're typing. That's a common security measure in Linux. Just type in your password and hit enter.
[root@archiso /]# passwd
New Password:
Retype new password:
passwd: password updated successfully
Now let's create your own user you're going to use. Run the following command to create your user, and change your password immediately. Try not using the same password you use for the root account.
[root@archiso /]# useradd -m -G wheel -s /bin/bash <username>
[root@archiso /]# passwd <username>
New Password:
Retype new password:
passwd: password updated successfully
In the useradd command, we specify that
- You need a home directory (
-m) - You belong to the wheel group (This is the admin group we're going to set up later) (
-G wheel) - Your shell is
bash(-s /bin/bash) - Your username is <username>
Let's make you an admin by giving the wheel group the necessary privileges. Edit the sudoers file by using a special command designed to edit that file safely.
[root@archiso /]# EDITOR=nano visudo
Here we specify the editor we want to use, which is nano. Uncomment the line below inside this file and save and close it.
## Uncomment to allow members of group wheel to execute any command
%wheel ALL=(ALL:ALL) ALL
Now log into your user and test out your privileges. If the following command outputs root, you've successfully configured your sudo privileges.
[root@archiso /]# su <username>
[<username>@archiso /]# sudo whoami
root
[<username>@archiso /]# exit
Hostname
You can set your hostname by editing the following file:
[root@archiso /]# nano /etc/hostname
# replace <hostname> with the hostname of your choice, then save and exit
<hostname>
Enable Network Manager
You need to enable Network Manager to have it get started every time you boot.
Note: This command is case-sensitive! It won't work if you type it wrong.
[root@archiso /]# systemctl enable NetworkManager
Grub Setup
We need to install GRUB to the harddrive and generate it's default configuration. Type the following commands to do so.
Note: Replace /dev/vda with your proper drive name!
[root@archiso /]# grub-install /dev/vda
[root@archiso /]# grub-mkconfig -o /boot/grub/grub.cfg
Rebooting safely
You can now exit out of the live-shell by simply typing exit. You'll know when you're back in the flash drive when you see the good old red shell.
# prepare exit of live environment
[root@archiso /]# exit
---
root@archiso ~ #
Now, unmount all unmountable drives (which should include your harddrive) and reboot into your fresh Arch installation!
root@archiso ~ # umount -a
root@archiso ~ # reboot
Continue with the next guide if you'd like to install a GUI on top of Arch for ease of use.
Finalization
Desktop Environment
Now it's time to choose your desktop environment, if you want or need one.
KDE
KDE is a powerful and feature rich desktop distribution that at first resembles a layout similar to that by Microsoft Windows. KDE is very customizable though, and it can be changed to look like almost anything. This DE although is more suited for newer hardware, as it does need more resources than others.
Install KDE, a login manager, a file manager, a browser and a terminal with the following command:
$ sudo pacman -S plasma sddm dolphin firefox konsole
$ sudo systemctl enable --now sddm
Gnome
Gnome is a DE that is ideal for laptops and people who like polish. It is a very stable and responsive distro, although still very customizable with extensions and themes. Resource-wise, Gnome is less of a resource hog than KDE, though there are still more lightweight choices for older hardware.
Install Gnome and a browser with the following command:
$ sudo pacman -S gnome firefox
$ sudo systemctl enable --now gdm
Then continue on with your login. If you've got an NVIDIA card, use the Xorg variant in the bottom right menu, until NVIDIA adds proper support for Wayland.
AUR Helpers
To simplify the process of installing packages from the AUR, we can use an AUR Helper, like yay or pakku.
They are also wrappers of pacman, so you can also use them to install packages outside of the AUR.
This covers installing both of them.
yay
# We need git and base-devel to download packages from the AUR. If you didn't install it already, do so now.
$ sudo pacman -S --needed git base-devel
# Then clone the appropriate repository into a temporary folder.
$ git clone https://aur.archlinux.org/yay.git /tmp/yay && cd /tmp/yay
# Once you're inside the newly created directory, compile and install yay
$ makepkg -si

# You can also use the following one-liner:
$ sudo pacman -S --needed git base-devel && git clone https://aur.archlinux.org/yay.git /tmp/yay && cd /tmp/yay && makepkg -si

# Use yay like you would use pacman, it uses the same syntax.
$ yay -S <package>
$ yay -Syu
# etc.
pakku
You can use the same steps for pakku as for yay.
# We need git and base-devel to download packages from the AUR. If you didn't install it already, do so now.
$ sudo pacman -S --needed git base-devel
# Then clone the appropriate repository into a temporary folder.
$ git clone https://aur.archlinux.org/pakku.git /tmp/pakku && cd /tmp/pakku
# Once you're inside the newly created directory, compile and install pakku
$ makepkg -si

# You can also use the following one-liner:
$ sudo pacman -S --needed git base-devel && git clone https://aur.archlinux.org/pakku.git /tmp/pakku && cd /tmp/pakku && makepkg -si

# Use pakku like you would use pacman, it uses the same syntax.
$ pakku -S <package>
$ pakku -Syu
# etc.